Last week on my way home from work I drove to Katonah, NY to see the quilts at the art museum.
It is a lovely exhibit combining traditional and contemporary works of art. There are several vintage quilts on loan from the Shelburne Museum, as well as a Gee's Bend quilt in polyester, a wire and metal wall hanging, a 3-dimensional free-standing quilt, and an all-wood, carved and sanded quilt-artwork.
If you can spare the time, it is well worth a visit before the exhibit closes June 13th. Check the website for docent tour dates and times. http://www.katonahmuseum.org
(And although the museum is the opposite direction from downtown Katonah, the quaint village is a great place to grab a coffee or a bite to eat.)
Saturday, May 18, 2013

Saturday, April 27, 2013
Spiraling Out
 |
| Spiraling Out of Control 17" x 48" |
I just finished this piece. I am calling it "Spiraling Out of Control". It was started more than a year ago with machine-pieced fabric based that I quilted using a free-motion swirling design. Then I sprinkled powdered fabric dye on top and added fabric spirals backed in fusible web.
Sunday, April 14, 2013
Sneak Peak - Felting Vintage Textiles
I am pleased to learn that an article I wrote, "Felting Vintage Textiles", has been accepted for publication in the August/September 2013 Quilting Arts Magazine!
The article explains my technique in step-by-step detail with lots of photos to enhance your understanding. Here are a few pictures showing the before and after of two projects. Be sure to look for a copy of Quilting Arts Magazine later this year for a full article.
The article explains my technique in step-by-step detail with lots of photos to enhance your understanding. Here are a few pictures showing the before and after of two projects. Be sure to look for a copy of Quilting Arts Magazine later this year for a full article.
 |
| Before: crocheted panel is laid atop wool roving |
 |
| After: crocheted panel has been sandwiched in wool fabric |
 |
| Work in Progress |
 |
| Before |
 |
| After |
Monday, March 18, 2013
SAQA Regional Show - "Local Color"
My quilt "Aerial View" was selected for the regional Connecticut SAQA exhibit that opens in May 2013 at the Western Connecticut State University in Danbury.
All the quilts in the exhibit have a Connecticut theme. Mine was inspired by a recent airplane flight into Bradley Airport.
All the quilts in the exhibit have a Connecticut theme. Mine was inspired by a recent airplane flight into Bradley Airport.
 |
| Aerial View 2013 |
Sunday, February 17, 2013
Felting in Hartford
Yesterday, my art quilt group, Connecticut Fiber Artists Collective (CFAC) sponsored a wool felting workshop at the Unitarian Society of Hartford.
What a fabulous day full of fiber and fun! We learned to nuno felt under the tutelage of Robin McCahill, a master felter, teacher and puppeteer.
Here are some pictures of our day.
What a fabulous day full of fiber and fun! We learned to nuno felt under the tutelage of Robin McCahill, a master felter, teacher and puppeteer.
Here are some pictures of our day.
 |
| Glorious bumps of wool roving in all colors |
 |
| Placement of wool roving in layers on bubble plastic prior to felting |
 |
| Toni proudly displaying her "to be" flowers and leaves |
 |
| Toni and Roz rolling |
 |
| A finished scene- wool roving on silk chiffon- magnificent! |
Monday, January 28, 2013
Joe's Quilt - Free Quilt Pattern

Joe’s Quilt
Size:
Approximately 46"x90"
By Mary Lachman
Quilt designed and made by Mary Lachman
Materials Needed:
- Dark and medium fabric scraps or fat quarters – choose a variety of large, medium and small florals and patterns (flannels works well)
- 2 yards of light fabric
- ½ yard for binding fabric
- 3 yards backing fabric
- quilt batting of your choice
- Thread to match fabrics
Cutting and Piecing Directions:
Four-Patch "Bricks":
- Cut 3 1/2" x 4 1/2" rectangles from dark and medium fabrics.
- Sew two of the 3 1/2" x 4 1/2" rectangles together along the 4 1/2" edge, press toward the darker.
- Sew two more 3 1/2" x 4 1/2" rectangles together along the 4 1/2" edge, press toward the darker.
- Sew each set together along shorter edge.
- The Four-Patch Brick should measure 5 1/2" x 8 1/2"
Light Bricks:
- Cut 5 1/2" x 8 1/2" rectangles from light fabric
Assembly:
- Sew Four-Patch Bricks and Light Bricks together in rows, alternating each brick.
- As shown, the quilt is 9 bricks (width) and 11 bricks (length) but you could make it any size you wish.
- Once the top is completed, layer backing, batting and top.
- Quilt as desired and bind. Make sure to label your finished artistry with your name and date of completion!
Friday, January 18, 2013
Quilt Envy
Eight years ago, when a friend gave birth to her second child, I presented her with a handmaded scrappy baby quilt. She adored it and so did her son. For years since she has repeatedly told me how much she and Alex enjoy looking at the colors and patterns.
Interestingly Alex has become a very artistic boy who is always drawing and painting pictures. Recently his mom asked me to stop by for tea and cake. I took along a few quilts to share with her and Alex. Alex showed me his paintings and gave me a tour of his bedroom, which he shares with his brother, Joe. There at the end of Alex's bed was the baby quilt I had presented him with 8 year ago---a little faded, but clearly loved.
It was clear to me Alex needed another quilt, a bigger one, now that he was a big boy, and I thought I had the perfect one at home that I finished last November. I told my friend of my plan and if it would be ok to give Alex a quilt, but not Joe. She assured me that it would be fine.
So, a few days later I presented her with a scrappy flannel quilt made from 4 1/2 inch squares. Here is a picture of Alex curled up on top of his new quilt!
But sometimes one is not enough!
Alex's older brother, Joe (10 years old) was mesmerized by the new quilt on his brother's bed (too his mother's surprise) and it just happened that I had another recently flannel quilt in the closet. Just the trick for a belated birthday present!
Check back to the blog in the next week or so and I will share my patterns for both of these quilts.
Interestingly Alex has become a very artistic boy who is always drawing and painting pictures. Recently his mom asked me to stop by for tea and cake. I took along a few quilts to share with her and Alex. Alex showed me his paintings and gave me a tour of his bedroom, which he shares with his brother, Joe. There at the end of Alex's bed was the baby quilt I had presented him with 8 year ago---a little faded, but clearly loved.
It was clear to me Alex needed another quilt, a bigger one, now that he was a big boy, and I thought I had the perfect one at home that I finished last November. I told my friend of my plan and if it would be ok to give Alex a quilt, but not Joe. She assured me that it would be fine.
So, a few days later I presented her with a scrappy flannel quilt made from 4 1/2 inch squares. Here is a picture of Alex curled up on top of his new quilt!
 |
| Alex's Quilt |
Alex's older brother, Joe (10 years old) was mesmerized by the new quilt on his brother's bed (too his mother's surprise) and it just happened that I had another recently flannel quilt in the closet. Just the trick for a belated birthday present!
 |
| Joe's Quilt |
Monday, September 17, 2012
Hats on the Way
This past weekend I focused on two things (instead of running errands or working in the garden):
#1 - Completing hats for the Creative Arts Workshop 44th Annual Celebration of Arts and Crafts; and
#2 - Cleaning up the studio so I could see the floor again.
This year CAW asked me to provide them with a dozen hats. However, since life is crazy and I am a runs-with-scissors-kind-of-girl it wasn't until yesterday that I knew I could meet their request. I love making hats and this year I decided to try a few new ideas. I hope you have a chance to go to the exhibition which runs from October 27 through December 24, 2012.
Most of my hats are knit of 100% Peruvian wool, felted in the washing machine and shaped by hand. Wool is naturally warm and weather resistant and renewable.
 |
| Here is an example of a traditional felted wool topper accented with a grosgrain ribbon band and vintage button. |
 |
| In this one I added embellishments of handcrocheted flowers and vintage buttons. |
 |
| This hat is made from recycled wool garments (a vintage skirt and a handknit scarf). It is lined with fleece. |
 |
| Here the flower embellishment is made from the trim of a recycled wool sweater. |
 |
| All tagged and ready to go to New Haven. |
Friday, September 7, 2012
Felted Wool Hats
The summer has slipped away and I am finishing hats for the 44th Annual Celebration of American Crafts 2012 at the Creative Arts Workshop in New Haven, CT www.creativeartsworkshop.org .
The gala exhibition and sale runs from October 27-December 24, 2012.
Here are a few examples of my hats. These are hand knit of 100% wool and then felted to form a warm dense fabric that is resistant to wind, rain and snow. They are available in small, medium and large sizes.


The gala exhibition and sale runs from October 27-December 24, 2012.
Here are a few examples of my hats. These are hand knit of 100% wool and then felted to form a warm dense fabric that is resistant to wind, rain and snow. They are available in small, medium and large sizes.


Friday, August 10, 2012
Slice and Dice
This week I decided to give something new a try. Sort of a cut-and-sew, but I think it is more aptly termed slice-and-dice.
I randomly pieced together some scraps, then decided to add some gold strips by stitching them in and then cutting the main fabric and stitching the gold strip down on the other side. I repeated the process until I had a maze like configuration of blue and gold. Then I did the same with multi-colored batik strips.

 This bottom photo is the completed piece. What do you think? Now to name that piece. Initially I liked Yellow Brick Road, but now that the batik is added that doesn't seem right. It will come to me. Do you have any suggestions?
Tomorrow I will travel with friends to Lowell, MA for the quilt show and the Brush Gallery exhibit where friends Diane Cadrain and Diane Wright have pieces. It should be fun!
I randomly pieced together some scraps, then decided to add some gold strips by stitching them in and then cutting the main fabric and stitching the gold strip down on the other side. I repeated the process until I had a maze like configuration of blue and gold. Then I did the same with multi-colored batik strips.


Tomorrow I will travel with friends to Lowell, MA for the quilt show and the Brush Gallery exhibit where friends Diane Cadrain and Diane Wright have pieces. It should be fun!
Saturday, August 4, 2012
Fabric Dyeing and "Boys"
Today we had a day in the sun as the CFAC group and friends learned ice cube dying from Carol Ludington and confetti dyeing from Carol Eaton.
I was so tired when I got home that I just floated around the swimming pool in an inner tube listening to "Selected Shorts" on WNPR. One of the stories by Rick Moody entitled "Boys" was particularly poignant. Here is the link to one of the first times it was broadcast back in 2010.
http://www.wnyc.org/shows/shorts/2010/jun/27/
Did anyone else hear it? It made me think of my sons and with the younger leaving for college later this month I was rather melancholy.
The following are photos from today's hand dyeing workshop.
 |
| Carol demonstrating how to layer ice cubes, fabric and dye. |
 |
| My cooking pots |
 |
| Carol V. in uniform |
 |
| Confetti dyeing |
 |
| Confetti dyeing |
 |
| There was even some crocheted pieces that made it into the vat! |
Friday, June 22, 2012
Class of 2012
 |
| "Cabin Fever" for Clark |
I have been finishing graduation presents for my son's friends these past few weeks. James has a close set of buddies and they all graduate from high school today! Congratulations to the Class of 2012!
 |
| "3 More Hotels Please" for Zack (who has beaten us so often in Monopoly that we won't play with him any more) |
 |
| "Poppy Garden" for Lili |
 |
| "Yeladim Days" for Adena |
 |
| "Starry Night" for Griffin |
 |
| "Touche' " for Joe |
 |
| "Autumn Batik" for Matt |
Friday, June 8, 2012
Come to the Gallery on the Green in Litchfield
I am stitching like crazy in preparation for the 39th Gallery on the Green Arts and Craft Show in Litchfield this Saturday, June 9th from 9:30 am - 4:30 pm.
For those of you who have never been there, Litchfield is a great day trip and when combined with the art show it only gets better! There will be food, ice cream, kids activities, and of course the art show/sale.
Here are a few things that I have been making---pincushions and table runners! Hope to see you there.

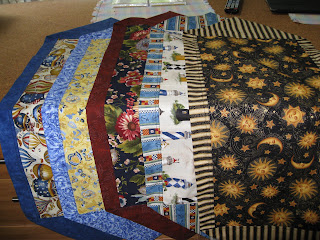

For those of you who have never been there, Litchfield is a great day trip and when combined with the art show it only gets better! There will be food, ice cream, kids activities, and of course the art show/sale.
Here are a few things that I have been making---pincushions and table runners! Hope to see you there.


Tuesday, May 8, 2012
Early Morning Time
I woke up before the alarm today and coffee in hand headed to the studio...and yes it is a mess. So what else is new?
 |
| The cutting table this morning |
Here is a piece I am working on....destined to become a table runner. I am in a table runner phase at the moment. Maybe that is the result of my thrill of mastering mitered corners.
 |
| Project in progress |
 |
| "Eye of the Storm" |
Please go to http://www.ctfac.blogpost.com to see the works of other members!
 |
| The contents of my Challenge Bag---from whence the storm came! |
Sunday, May 6, 2012
Old Maine Class - May 12th
 |
| Old Maine Variation, designed and pieced by Mary Lachman |
Sunday, April 22, 2012
How to Make Mitered Corners on a Quilt with Double Borders
Mitered corners are beautiful and elegant. This past month I decided to get serious and learn to make a proper mitered corner. I hope this mini tutorial will help you put them on your next quilt.
Step 1: Sew your double border fabrics together lengthwise. (Sewing multiple borders on one-at-a-time is not efficient and the end product is not as nice as if you do it this way.)

Step 2: Sew double borders to adjacent sides of the quilt top. Stop stitching before each piece intersects with the other. In this image the vertical border is on top of the horizontal border.

Step 3: As you look at this next image, the vertical border is folded back onto itself and the horizontal/top border is turned down on the vertical border. Press the seam between the 2 fabrics in the border so that at this corner, the seam between the 2-fabrics of the border is pressed down toward the inner fabric. (In this example, my inner border is the multi-colored fabric). Remember the mantra "top-down" and "bottom-up".

Step 4: Return the horizontal/top border to the original right-side up fashion and place the vertical border on top of it.

Step 5: Turn the vertical border under (and free-edge out) at a 45 degree angle. The inner border on the vertical border should be pressed up toward the outer strip (or "up" in this image). Again, recall the mantra, "top-down, bottom-up". (Remember the "top" is the horizontal border and the "bottom" is the vertical border in this image.) Because you placed the seams in opposite directions at the intersection of this corner, when you stitch the mitered corner from outside free-edge in to center the fabric will nest itself perfectly and you will have a beautiful and elegant corner!

Step 6: Press the corner seams with a hot iron. Option: pin the fabrics together at the free-edge near the pressed crease.

Step 7: Turn the vertical border strip on top of the horizontal strip. You will be able to see the crease in the fabric made by the iron.

Step 8: Stitch in the creased area from the outer free-edge in toward your quilt top.

Step 9: Clip excess fabric from seam and corner.

Step 10: Press right side of top.

Step 11: Press underside. Pressing the seam open at this point will reduce bulk.
Repeat all steps at the remaining corners of the quilt.
Subscribe to:
Posts (Atom)